Guest viewing is limited

Ventilation mod needed for this hamster home?

ross1010

New member
Member
Messages
5
Reaction score
2
Points
3
Hello Everyone, I am getting my daughter setup for her first hamster (Syrian). We bought a setup from another family whose hamster passed of natural causes.

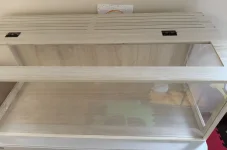
For this hamster home, do you think the plexiglass of the lid should be replaced with some 1/2" hardware cloth, for ventilation? If so, do you think that will be sufficient? The top window is about 5.5"x42" (overall enclosure about 47"x20").

I have a feeling this enclosure might have been intended for reptiles, as the slots at the top are just over 1/8" wide x 20". I'm thinking I should also silicone the exposed end grain around the plexiglass on the ends should there be any sickness or disease, but you all can tell me if you think that's needed

Thanks for your guidance!


IMG_3009.webp
 
Hello and welcome :-) It does look a bit lacking in ventilation. The slots at the top are fine, but usually enclosures like that have holes/vents in the side perspex as well, so there's through ventilation.

You have a few options there - you could make side vent slots in the perspex or you could replace the side perspex with mesh. Or the top perspex with mesh - but side slots can be quite important, as well as top ventilation even if you did mesh the top. Unless you have the right tools, cutting vents in the side perspex could be quite tricky.

Or - you could leave all the perspex as it is and replace the back wood panel with mesh (or do that and replace the top perspex with mesh as well).

Even if the last hamster passed from natural causes, it will need disinfecting inside and any scent removing. Cleaning it outside is good as well becausue it can still have the scent of the previous hamster even on the outside and that can upset another hamster. You can just use any spray disinfectant that's safe for small animals. Are you in the Uk? If so Beaphar, Johnsons or Safe4Pets are all fine (the small animal versions). The latter can be unscented as well. It then needs wiping out and/or airing to remove traces of any scent from the first two. It's only a light scent but can bother them.

It's great you've looked into the need for ventilation :-)

If you have a look at something like this, it has slots on the entire roof and slots at both sides. And even then, more ventilation is always better.

 
Hello Maz, thanks for your welcome and speedy guidance!

It sounds like replacing the top perspex is a no-brainer. And it should be easy to remove and replace. I'm assuming 1/2" hardware cloth will work, and if I can find stainless, I will.

I don't think we will remove the end panels, because she is thinking to put 6-9" of bedding for the hamster to burrow into, at least on one end.

As to the sides, I agree that is more tricky. I have shop tools like hole saws, routers, drill press but even then, it is more tricky cutting those without removing the end panels, and even then, it seems like I might need a new single fluted router bit. I agree cutting the back may be easier, possibly a few holes with hardware cloth attached on the back side may be easiest, but will think on the approach today.

Do you happen to know the slot width on most of those enclosures?

As to cleaning, we already wiped the exterior of the enclosure with a traditional lysol wipe then wiped it with a wet rag. For the interior, we were planning on using vinegar 1:1. Do you think this is sufficient, or we should go with a commercial product? Here in the states, I think Nature’s Miracle Small Animal Cage Cleaner is the one I see recommended - I have to look if the ones you mentioned are available.

Lastly, do you think that the silicone on the exposed porus end grain (where plexiglass is installed) is necessary for sealing?
 
  • Like
Reactions: Maz
You're welcome. Yes meshing the top and maybe just adding some vents to the back might do it. You can get circular vents that just push in after cutting a hole for them - I've seen people use those before. Or whatever is easiest.

1cm square mesh is the usual. I think half inch isn't much bigger, but smaller would be better. Smaller than 1cm square can be hard to find though.

I'm not that familiar with the Nature's miracle - I looked it up and it doesn't say it's a disinfectant - says it's a cleaner. Another popular one in the US is F10 (link below). Which is a disinfectant.

Vinegar isn't a complete disinfectant - it kills some bacteria but not all - it's also a cleaner really - although it can kill bug eggs sometimes (but any disinfectant will do that too.

So maybe F10? I think it needs diluting - you'd need to read the pack! This is just before first use. After that, then the Nature's miracle sounds fine for future cleaning. It doesn't need disinfecting again unless there is any illness or infestation (eg mites) which hopefully you won't get :-) Providing the hamster has a good diet and a nice environment and it looks like the hamster will have a lovely environment!


Slot width - if making any slots they should be no wider than 1cm - anything wider than that and a hamster can get through - especially if they're long slots. Assume it's for a Syrian hamster?

I'm not quite with you about the silicon - do you mean remove it? Or clean it?

It's all exciting stuff anyway, getting prepared for a hamster :-)
 
Last edited:
Thinking about it - a strip of mesh along the width of the back panel would be just as good as side vent slots and easier probably. And cutting perspex could be risky - you wouldn't want to break it.

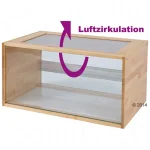
Similar to this tank style - it has a meshed roof and a strip of metal mesh at the back for the through flow.


marrakesh.webp
 
I'm thinking I should also silicone the exposed end grain around the plexiglass on the ends should there be any sickness or disease, but you all can tell me if you think that's needed
Whereabouts is the exposed end grain please? I'm not quite clear on that. Is it an area you can't use disinfectant on?
 
You've made my day actually - I love talking about ventilation on hamster cages :ROFLMAO: It's something that can get overlooked and it's very important. Hamsters have quite sensitive respiratory tracts.
 
Whereabouts is the exposed end grain please? I'm not quite clear on that. Is it an area you can't use disinfectant on?
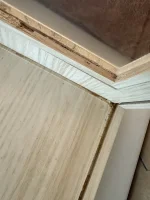
Hi, below is a picture of the cage's construction. In this picture, I've already removed the back panel.

As you can see, around the edges of the side windows, there is porous grains (most disinfectants are made for solid surfaces (not porous). So, I was thinking perhaps I should silicone them, as there isn't a way to disinfect them. This is definitely an effort to do cleanly.

Additionally, the front and back panels insert into a kerf in the wood, such that there will be exposed end grain there, though I don't know there is much that can be done about those, unless I permanently seal it shut. Probably the right thing is to just silicone all the lower and riser corners like a fish tank + the windows. I don't believe the upper edges are as critical, as litter isn't being thrown there or falling in the crack. I just have to accept that the cage just can't be able to be disassembled in the future if there was some time between hamsters.

I think on the ventilation, either popping some round vents in the end (maybe 2 2" or 2-1/2" holes each end) or either holes or rectangles in the back (I wouldn't want a strip all the way across for structural reasons). The issue with the back is that inevitably it will be close to the wall, given the cage is reasonably deep.

Either way, I have to determine how low I can actually go, given the desire for some deep bedding for burrowing. With 18" of interior height, how deep do you think she can go with the bedding? She has read that deep (like 9") is preferred, and clearly, with a 12.5" wheel, one end will need to be lower.

BTW, picked up the F10SC (available through Amazon here).

IMG_3015.webp
 
I see what you mean. You could maybe just seal those rough edges with plastikote - it just paints on - pet safe waterproofing paint. People use it a lot. A couple of coats - I tend to do one coat and then leave it overnight and do the next coat. This will seal them and also make them wipe clean so you can just clean them with disinfectant. It needs to be the little water based pots of enamel pkastikote.

But - I just remembered you’re in the US and it isn’t sold there I think. I know some people have actually sent for it to be shipped but that seems a bit excessive - there is probably an alternative in the US (I’ll check).

Can you get Cuprinol garden shades? That does the same thing - also apparently pet safe. Silicone is likely to get chewed off 🤣.

Do you know if it’s a male or female Syrian she will be getting?

A couple of vents at the back sounds good :)
 
I’ve just seen that Walmart sells the plastikote but at a ridiculous price of $37. It must be import costs as it only costs about £5 in the Uk! A little pot goes a long way but you would probably need two pots and $70 seems a bit excessive!

 
An alternative might be water based mod podge - if it’s just for sealing. That is hamster safe (as long as it’s glitter-free). It’s not entirely waterproof but should be enough to just disinfect. It needs to be completely dry before a hamster can go near it. It's safe once it's dried.

You could just spray disinfectant on the rough edges but it would be better to seal them with something because they look tempting to chew at as they are.

It’s a shame the plastikote is so expensive because it’s great stuff. People use it to paint platforms, houses and inside wood cages (it comes in various colours) and it waterproofs the wood and makes it wipe clean.

Apologies for the typos - I’m on my phone at the moment!

But basically, for disinfecting, you could just spray those areas (can the F10 be used in a spray bottle? I would have thought so as most disinfectants come in spray bottles). So then it's just for aesthetics and to avoid chewing at it.
 
Last edited:
Thanks for all your help.

I did find PlatiKote on Amazon for $17, though from unknown seller. The concern I have with paint, is it doesn't really fill gaps/cracks/porosity. Maybe you will tell me this one works differently.

I'll have to look at the mod podge as well. My intent is to seal the cracks/porosity/etc, where, should the hamster get something contagious and die, it can't harbor. But, at the same time, I'm a little unclear on that, as most viruses can't live outside a host for very long. I think for the corners of the cage, that would still leave me using some amount of silicone, even if it is thin. The good thing about pure silicone is it's inert and inside corners are difficult to get to.

Do you think she can put 9" of bedding in a 17" tall enclosure?

Lastly, do you know if hamsters will chew on the welded wire/hardware cloth? Thinking if I have to order stainless, or if regular galvanized is acceptable.
 
Sorry I forgot to answer the bit about the bedding :) 17" tall is about 43cm which doesn't give you a lot of wiggle room. 50cm tall is the usual height for a syrian, depending on how much bedding you want/have.

So for example, I find 8" deep bedding works fine in a 50cm tall cage (it's actually only 48cm internally) with just a bit hollowed out near the wheel where it needs to be a bit lower for a 12" wheel. For some hamsters, an 11" wheel is fine though.

I think if the cage is 17" tall and you have say an 11" wheel and need half an inch above that and a tiny bit of space under it, that is only going to allow for 6" of bedding - but if you have the wheel at one end you could have deeper bedding at the other end :-) Ideally the wheel would stand on a plaform, the top of which could be the same height as the bedding at that end - it can then be burrowed under.

At the other end you could easily have, say 10" of bedding (you could slope it up) if you have a semi subterranean house. Multiroom houses are very good and the roof of that makes another kind of platform. So if you had say a multiroom house (about 10cm high) on legs/stilts that are about 20cm (8") long, then the house would be semi submerged and about 2" of the house above the bedding (again you can hollow out a bit of bedding in front of the front entrance.

To be honest I wouldn't worry about disinfecting in the future with rough edges. Spraying disinfectant will get most places, and as you say, after about 3 weeks, any viruses or bacteria should be dead anyway.

And yes plastikote would paint on that. Obviously it's not as easy painting rough edges as smooth ones, but it will seal them and create a painted layer for wiping. It sets very hard. Not so noticeable after the first coat, but it is after the second coat.

If you can get it for $17 it could be worth it - just check it's the small pots of water based enamel paint like in the link above. Not the spray paint.

One thing I would be worried about with raw edges like that is aromas lingering if they get soaked in - eg vinegar. So it would be better if it was sealed.

Plastikote is great stuff though :-) It doesn't have a plasticised finish, as the name suggests, it just feels like semi gloss paint once dried. And it's virtually odourless. I use a half inch or quarter inch paint brush to paint it on. It's quite thin and spreads a long way.

If you can get that, then you could paint those edges with it, which would seal anything in. And then in future they are wipe clean/sprayable and no crevices.
 
Last edited:
Ok, thanks for the context on the bedding. Yes, this one is 47cm internally at the back, and from the mid point, slopes to 43cm at the front. Sounds like we should be able to work 7+" of bedding.

It seems like your experience is that (unlike typical wall paint), the platikote will help close seams and porous sections, which is good. I guess the thing I have going through my head is the value of sealing the end grain wood, but not the gaps where the wood comes together, or where it meets the plexiglass. I think you just mentioned smells, which would be a good reason. I had read some things about mites and thought they might be able to harbor in gaps between the wood and plexiglass, but most cages are probably not sealed this way and I'm likely overthinking it. Yes, these are the 59ml pots (that is quite tiny).

I think we need to find/make one of those multi-room houses like what you mention. I think we also need a platform for the wheel that came with the cage (this smooth Bucatstate 32cm wheel... they sure have changed from the 8" metal rung wheel when I was a kid... squeak, squeak, squeak...).

I'd probably like to make some of those wood supports/houses. I see in videos like this one from Victoria that she mentions use of Aspen, Spruce, Poplar, Birch, and Balsa and use 'dowel rods'. Do you know if matters of those dowels are of the same wood, or they don't tend to chew on the supports? I have a sense these may not be made out of the preferred woods. I also saw the excellent listing of safe woods on the site here.

Also, I noticed in one of her other videos that she mentions a 'pure bond aspen plywood', but I think it's just the top visible ply that is aspen (mine has poplar available). Do you have any guidance on plywood selection?

Edit: I guess if plywood turns out to be a hassle, then I'll just need to buy some doug fir and plane it down, but that is a lot of extra effort!
 
  • Like
Reactions: Maz
That's a fantastic wheel - lucky hammy :-) As it's height extends between 33.5cm and 47cm I'm wondering if you could just have the wheel on the base of the cage, extended to the full height on the stand. And not need a platform for it to stand on. If it's 47cm high at it's tallest height then you'd need the wheel at the back of the cage really - at one end maybe. You'd have less substrate in that area but can slope it up deeper further away from it.

And yes you can make your own platforms and legs/stilts. Pine wood is probably easiest as long as it's kiln dried. It's hard to find formaldehyde-free plywood. I've just bought beech dowels before but hardwood is harder to cut/saw to the right length (for me anyway!). You can get pine ones as well. For houses I used to use the thin ones and just glue them to the house (I'll add an example below) so they were permanently fixed. That was before you could buy stilts commercially!

For platforms you might need 2cm diameter ones or more and screw through from the top of the platform down into the dowel (drilling a hole first is the easiest way). Working out the right height for everything is the tricky part ha ha. Even when you work it out, the bedding can flatten down at times or the hamster rearrange it! But rule of thumb is to have a platform about 2" above the substrate. Any higher and ramps and access are tricky.

There are lots of things you can make. I made some low steps out of circles of cork bark (cut from a cork branch) and stuck those together (tip - plastikote is good for things like that too - no glue needed - it just sets them together).

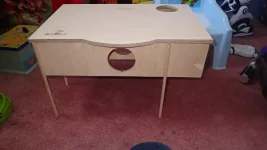
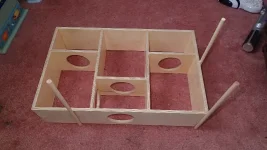
Making a multiroom house would be great. It really is just a box with compartments and holes cut for doorways.

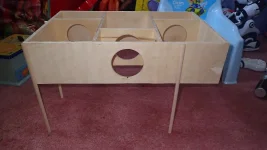
This is one I had (with the glued on thin dowel legs).

This one I had was one of the best layouts. The hamster almost always nested in the front left largest compartment - because it was the darkest area - light doesn't go round corners. At the other side, the hole in the roof let light in. But the do love going down a top entrance hole and popping out of it again.

This was a Rodipet house (I think they were one of the first to ever make them in Germany - also Getzoo). They don't make this one any more. There are lots of similar ones but it annoys me that they don't think about how the hamster will use it! Eg the top entrance hole in the wrong place so there is no dark compartment.

This one was about 41cm wide by 26cm deep and about 9cm tall. It fitted most of the width of the cage so I had it at one end and it doubled up as a platform.

The only reason it has offset legs is because it was to fit in a barred cage which had a sloping base, so I couldn't have the rear legs too near the back.

Lots of diy ideas in this section as well :-) And a whole thread on what you can make with cardboard. Pringles tubes make good tunnels (wiped out).


I'll have a think about the raw ends and maybe others will have some ideas as well - it's still summer holidays so people are busy. But basically if you can spray disinfectant I think it will get into most crevices and if it was me I'd just paint the edges with plastikote. Some people might put metal strips on them!

While the round entrance holes were very nice on that house, I've found that when hamsters get older, they used to struggle climbing over the bottom part, so we then just cut the bottom parts out so they were u shaped entrances instead of round ones.

These were made from birch plywood which was apparently formaldehyde-free. Plywood would be easier for making a house - pine would be ok - a bit heavier but ok if supported with legs. But it would need to be that bit bigger to allow enough space in the compartments. Pine better for platforms maybe.

The safe woods article was written and researched by @Daisy . If she's around, she might have some ideas on the edges of your cage as well.
P4171198 (2).webp

P4171199.webp

P4171200 (2).webp
 
Last edited:
Back
Top